.svg)


What is image optimization in SEO [and how do you do it well]?
First, let's talk about what image optimization is in SEO.
Optimizing your images for search engines like Google is the essence of image SEO optimization.
This means that you optimize images for multiple Google factors such as ALT tags, image title, caption, etc. to attract visitors for multiple keywords in Google image search.
Important image factors
Did you know that websites with well-optimized images generate organic traffic from Google image searches, which can represent 20-60% of all Google traffic ? That's a lot of search traffic, right?
That's the reason why you can't optimize your images for SEO. There are a ton of things included in an image, especially when you want to optimize it for SEO. Below is a list of some of the most important factors in optimizing images for SEO.
- Image name
- Image alt text
- Relevance of the image
- Image caption
- Image title
- Image size
- Image hosting
- Hyperlinked images
Let's talk about each of the image factors mentioned above so that you know how to easily optimize an image for SEO.
Image name
It's important to name your images. Don't use random image names, save them to your local computer or laptop, and upload them again to your WordPress dashboard with the same image file name.
Most image names are unnatural. For example, if you use images from your DSLR, they will most often have names like “DSC02512.JPG.”
As you can see, this type of image file name is not going to help readers or search robots understand what it is. That's why you should use appropriate and relevant names for each image before uploading them to your WordPress dashboard.
Another important thing to remember is to use hyphens to name your images rather than underscores.
Did you know that Google treats hyphens and underscores differently when it reads the Alt Text of a text or an image? Yes, that's right.
For example, Google will read “SEO-images” as “SEO images” while it will read “SEO_images” as “SEOimages”.
So name your images correctly using relevant keywords instead of using random numbers or underscores.
Image Alt Text
Image Alt Text is extremely important and you should optimize your images using appropriate alt texts for your images if you want to get better organic results.
In fact, the Alt Text of an image provides information to search robots about the context of the image. So, if you use appropriate keywords in your alt tags, you have a better chance of appearing for those keywords in Google image search.
This is what it looks like from the WordPress dashboard.

When using image alt text SEO, be sure to use 4 to 5 words to get better results with search engines like Google.
For example, if you're targeting a keyword like “image SEO,” you can use alt text in one of your blog post images with a 5-word Alt Text like “best image SEO tips” instead of just using “SEO tips” or something else that's only 1 or 2 words long. Did you get it?
Relevance of the image
Knowing where to add your images to your blog posts or pages is very important. As a general rule, be sure to include at least one image for every 500 to 1000 words. That means you can have 5 to 10 images for a 5000 word article.
We've already said that images make your content more visually appealing. So, by placing an image from time to time in your messages, you can break up your text and make it more readable for your audience.
It's also important to choose relevant images for your blog posts. You can't insert images randomly just for the sake of adding images. Make sure that every image you add is highly relevant to the content you're posting.
Image caption
Image captions are only shown below the image. Whether you know it or not, sometimes image captions carry more weight than image ALT tags.
The benefit of using image captions is that they can be read by visitors to your website (unlike alt tags that can only be read by search engine crawlers). Image captions describe an image, add context, and most importantly, give an idea of what your images are about.
If you use WordPress, you can easily create or add a caption to your images. Once the image is uploaded to your WordPress media library, you can enter all the details of the image, such as the title, the Alt Text, and a caption.
Here's what it looks like;
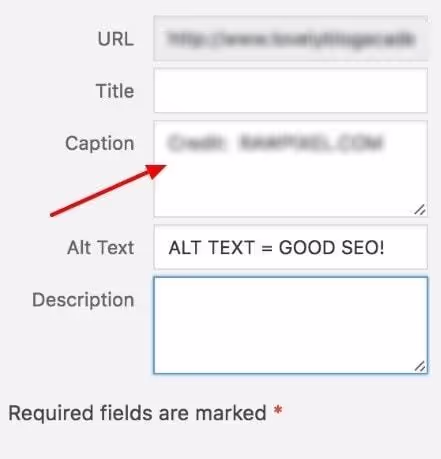
Once you've added the caption and the Alt Text, simply click the “Insert into the message” button to add the image to your posts.
Image title
The title of your image plays an essential role. Not only is it read by your audience when they hover over your image, but it also carries more weight if you use the right keywords in your title.
We recommend creating an easy to read image title and including a keyword phrase if you want to better optimize images for search engines like Google. Don't use random titles or default file names for your images.
Image size
Did you know that larger images lead to a higher bounce rate on your website? Let us explain it to you. The larger the image size, the longer it takes for your page to load and the higher the bounce rate.
That's why you should always make sure to optimize the size of your images so that they take up less space in your hosting and don't affect the load time of your pages too much. You can use online tools to resize your images and upload them to your WordPress dashboard after reducing their size.
If you are on WordPress, there are a few plugins that help you resize your images;
- WP Smush It
- Optimus
- TinyPNG
Let's talk briefly about each of the image optimization plugins mentioned above so that you can better understand them.
- WP Smush It : This is the most popular image optimization plugin for all WordPress users, as it helps you easily resize, optimize, optimize, and compress all of your images from your dashboard.
There's also a feature called lossless compression that allows you to reduce the size of your images without sacrificing overall quality. Overall, it's a great plugin for all types of bloggers who want to reduce the size of their images from the WordPress dashboard. - TinyPNG : This is an excellent WordPress plugin used by many bloggers to compress the size of their images. With their free account, you can easily compress up to 500 images every month. They also have a premium plan where you can compress up to 10K images.
- Optimus : This is another popular SEO image optimization plugin that allows you to compress all images <100Kb for free and is also a great alternative to the WP Smush it plugin. The best thing about this plugin is that it reduces the size of the image file automatically and depending on the image and the format, you can reduce the image size by up to 70%.
Image hosting
Our first recommendation is to reduce the size of your images before uploading them to your blogs. But if you're looking to host your images elsewhere to ease the load on your hosting databases and provide a faster experience for your site visitors, here are some recommendations for hosting images.
Use a CDN to host your images
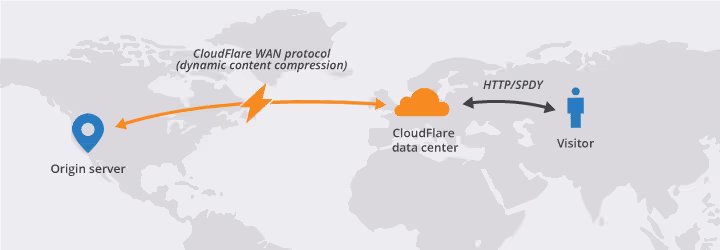
One of the best ways to improve the overall load time of your website pages is to host your images on a CDN. A CDN (Content Delivery Network) is a system of distributed servers that provide pages and other items such as videos, images, etc. to users based on their geographic location.
There are several options for CDN, in particular CloudFlare CDN (which is free), MaxCDN (which is a premium CDN but offers a lot more features).
If you're using hosting platforms like Bluehost, they offer CloudFlare integration by default. So you can easily integrate your websites with CloudFlare CDN from the control panel.
Here's how it basically works.
If you're wondering why you should use a CDN to host your images, here are some of the key benefits.
- faster load times (the #1 reason to use an image CDN is that your images are hosted elsewhere, not on your own hosting servers, which means you don't affect page load times)
- Reduces the load on your hosting (you don't affect the performance of your website hosting server at all by hosting your images on a CDN)
- Better security (it's almost impossible to perform security attacks such as DDoS attacks through a CDN network!)
- Save time (most of the time, you don't even need to reduce and optimize the size of your images, saving you time without compromising the quality of your images).
RECOMMENDED READING: Top CDN providers
Hyperlinked images
Did you know that you can easily make your images clickable? If you use WordPress, simply click on the image and choose the link option to insert a link that you want your website visitors to open when they click on your image.
Image linking is especially useful if you're writing reviews on affiliate products, as you can make your images clickable by inserting affiliate links.
For example, you can easily include clickable links in the banners of your affiliate products. So when your readers click on these banners or images, they are taken directly to the product page, allowing you to increase sales.
How do you find relevant and engaging images for blog posts?
Now let's talk about the most important thing. How do you find highly relevant and visually appealing images to use in your blog posts?
All you need to do is Google an image with a relevant keyword of your choice and then reuse it in your blog posts, right?
Wrong. Don't do that. Why?
Don't download images from Google and don't reuse them in your blog. Otherwise, you may face copyright issues that can sooner or later cause significant damage to your brand image or website.
So in this section, we're going to show you the easiest and most effective ways to find and create royalty-free images so that you can use them as you see fit in your blog posts.
What do you need?
Here are a few things you need.
- A website to find free stock photos
- An image editing tool
That's it, you just need the 2 things above to start using beautiful images on your site.
Let's talk about it briefly now.
3 websites to find and use free stock photos
To create engaging images for your blog posts, you first need a platform where you can download free images, so that you can edit them and add the text of your choice without problems.
There are literally a ton of free stock photo platforms out there. Among them, the following are great platforms that provide you with literally thousands of free images.
- Unsplash
- StockSnap
- Pexels
Let's talk briefly about the above platforms in order to understand how they work when you download images from them.
1. Unsplash
It's by far the best free photo platform that has access to over 110,000 contributing photographers and the website receives over 9 billion photo impressions per month. It also has a huge library of over 810,000 photos that you can use for commercial and non-commercial purposes without asking anyone's permission.
Simply put, Unsplash grants you a worldwide copyright license to download, copy, modify, distribute, and use Unsplash photos for free as you choose, including for commercial purposes, without permission from anyone (photographer or Unsplash).
2. Pexels
This is another great platform where you can find free stock images and videos from professional photographers around the world. This platform offers thousands of truly engaging images across a variety of categories including travel, technology, news, and more.
Like Unsplash, all photos on Pexels are also free to use and image attribution is not required. There is no need to credit the photographer or the Pexels site at all. You can edit images uploaded to Pexels as you see fit.
3. StockSnap
Most bloggers use StockSnap because it's considered to be the #1 source of beautiful free stock photos where you can find very high resolution stock images for free. And all images are free of copyright restrictions (CC0), which means that no attribution is required when using images downloaded from their site.
From business to nature to people and travel, you can find thousands of free, high-resolution images on this site. The good news is that hundreds of new free images are uploaded to the site every day, so you'll find new images every day!
The 3 main image editing tools
If you have access to Adobe Photoshop and know how to create and edit beautiful images, you don't need to look elsewhere.
But if you're not a tech savvy person and are looking for a simple and free tool to edit and create beautiful images, here are a few sites specially designed for you.
- Canva
- Pablo de Buffer
- Snappa
Let's talk briefly about the image editing tools mentioned above, which can be used for free in most cases.
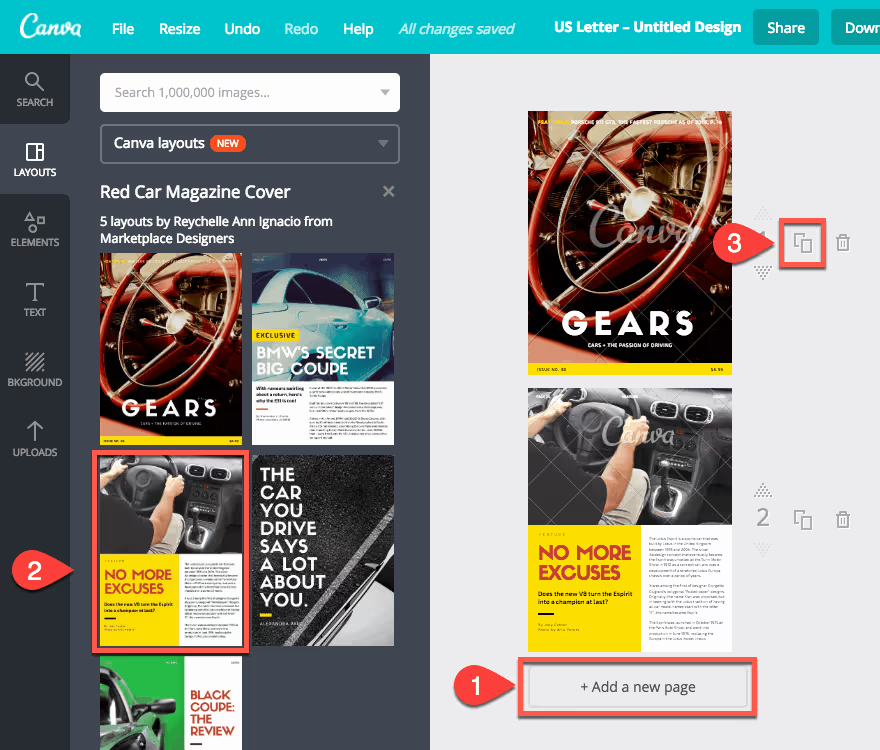
1. Canva
Canva is the top choice for most bloggers because it's one of the easiest image editing tools online to create featured images, YouTube thumbnails, logos, social media banners, infographics, and more.
It gives you access to over a million photographs, graphics, and fonts, as well as an easy-to-use drag-and-drop image editor that you can use to edit and create your images however you want.
With their free plan, you'll get these features;
- 2 folders to organize drawings
- 1 GB of storage for photos and assets
- Access to over 8,000 models
- Upload your own images
- Access millions of photos starting at $1 each
2. Pablo de Buffer
If you're looking for ready-to-use templates to quickly create images for your blog posts, Pablo is for you. You can search over 600,000 images and replace existing text with text of your choice.
It also offers over 25 font styles to create amazing images very quickly. You can also share your created and edited images on popular social networks directly from Pablo or download them to use anywhere.
3. Snappa
Snappa is a great alternative to Canva, where you can do the same type of image editing, including creating infographics, featured images for blog posts, logo design, etc. With Snappa, you'll have access to over 1,000,000 free, high-resolution stock photos.
With their starter plan (which is absolutely free to use), you get the following features;
- 1 user can access the site
- Access to over 5,000 models.
- Limited number of photos and HD graphics
- 5 downloads per month
- 10 favorites
And that's it. The above tools are absolutely useful for all types of bloggers looking to easily and quickly edit great images for their blog posts, YouTube channels, social media campaigns, and more.
XML image sitemaps
Did you know that you can increase the chances of getting more traffic from your images by creating a site map for your images? By creating an XML sitemap for images, you allow search engines like Google to easily discover the images on your site, which ultimately increases the visibility of your images.
By using "image-sitemap.xml “, you can tell Google which images are uploaded via JavaScript that the crawlers may not have found. So how do you create XML sitemaps for images?
As we all know, WordPress offers a ton of benefits and one of them includes image sitemaps.
For all WordPress sites, the creation and implementation of image sitemaps is extremely efficient thanks to a WordPress plugin called Udinra All Image Sitemap.
This plugin automatically creates the sitemap of the images uploaded to your WordPress dashboard. Once you have generated the image sitemap using this plugin, submit it to the Google Search Console (under Sitemaps).
This plugin also supports XML Sitemap and Image Sitemap, so there is no need to use two sitemap plugins and it also generates Alt Text for images without an alt tag, which is an exceptional feature.
If you don't use WordPress, there are several online tools that can explore your site and generate the site map, including Screaming Frog, DYNO Mapper, etc.
Responsive images
Not everyone uses a laptop or desktop computer to look up information online. The use of mobile internet has increased exponentially. That's why you need to make sure that all of your images load properly on all devices.
Responsive images ensure that you offer the right images to your website visitors based on their device.
If you want your images to be responsive and adapt to all types of devices, including smartphones, laptops, tablets, and more, you should either use responsive web design or use simple coding in your theme file to create responsive images.
Here's how you can do that.
Here is the tag to use when adding an image to your posts or pages to make them responsive.
<img src="nature.jpg" alt="Nature" class="responsive">
As you can see above, we mentioned class="responsive”, so first we need to insert a CSS code with the class called “responsive”.
Here's how you can do that.
Example:
.responsive {
width: 100%;
height: car;
}
The above changes are useful if you want the image to be scaled both up and down when responsive, as you set the CSS width property to 100% and height to auto.
For each image that you upload to the WordPress media library, WordPress makes the following changes by default.
- Vignette : A square cut whose size is 150px by 150px.
- Medium : The longest side is 300 pixels wide or high.
- Moderately large : It is resized to 768 pixels wide.
- Large : The longest side has a width or height of 1024 pixels.
- Complete : original image (regardless of the number of pixels in the image, it will be displayed in its entirety, without cropping).
Quick note: If you're not good at coding or don't have technical knowledge, skip the steps above and don't play with your themes' HTML or CSS code, as unwanted changes can damage your entire theme and the look of your website.
For people who are not tech-savvy, we highly recommend having access to mobile-friendly themes so that any images you add in your blog posts or pages can be displayed nicely on all devices, including laptops, tables, smartphones, and more.
If you are looking for an economic theme, don't miss Take a look at Elegant themes. You'll get access to over 80 themes (most of which are mobile-friendly) for only $80.
Open Graph and Twitter Cards Setup
With Open Graph, you can control how the title, image, description, etc. of your post or blog page looks when you share it on Facebook. It's the best way to make your posts look personalized when they're shared on Facebook. Twitter also uses Twitter Cards to personalize the appearance of your posts.
So how do you set up Open Graph and Twitter Cards?
There's an amazing plugin called WordPress SEO by Yoast, which helps you set up open chart maps for Facebook and Twitter.
Once you have installed and activated the plugin, click on social to find the Open Graph and Twitter Cards settings. Here's what that looks like;
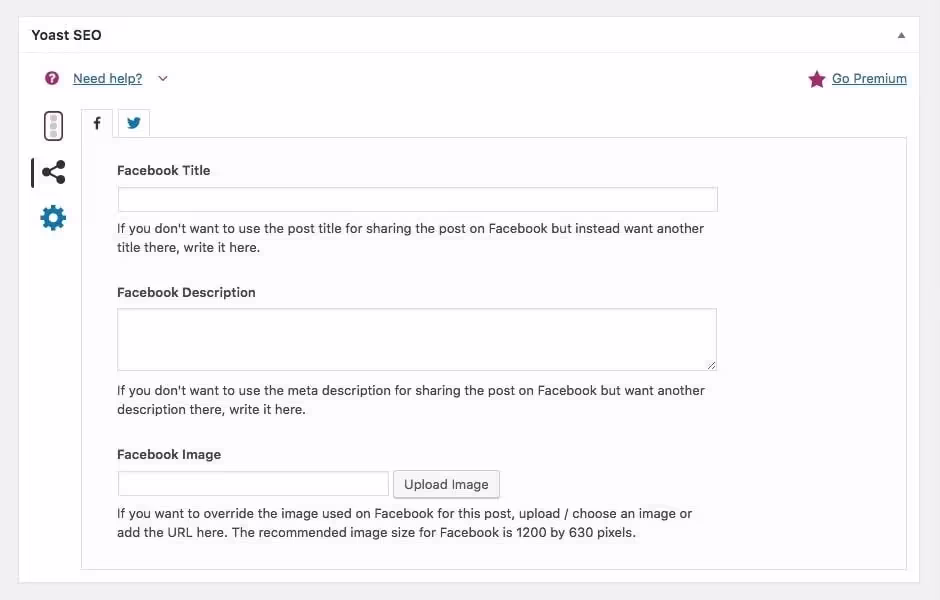
As you can see above, Yoast gives you the option to define custom Open Graph maps for Facebook where you can include a custom title, description, and image to display when sharing your post on Facebook. The same applies to Twitter Cards.
note : Be sure to open the “social” settings of the Yoast SEO plugin and add links to your Facebook, Twitter, and other social media profiles.
Image file formats
There are many different types of image file formats, including JPEGs, PNGs, GIFs, etc. Each image type has its own pros and cons, so it's best to use them for a better user experience.
- For most blogs, JPEGs are great because they offer the best quality and the smallest file size. JPEG is a lossy compression method that is commonly used for digital images.
- You can use GIFs for thumbnails and animations. For example, if you want to show an automated version of several images, you can create a GIF format, to make it attractive but the file size will be very important for GIFs, so only use it when absolutely necessary.
- PNGs can be a good alternative to JPEGs and GIFs. They offer you optimal image quality, but also consume more image size. So, if you're using a CDN as well as a faster hosting provider and looking to present the highest definition images to your audience, opt for PNG-style images.
FAQs
Here are some important image SEO questions you need to know to better understand in 2022 and beyond.
1. What are the benefits of using images in blog posts?
There are many benefits to using images in your blog posts or website, including the following.
- They break down your content to make it more readable.
- Images help you increase your organic traffic (especially when they're well optimized using the right Alt Text tags).
- They make your content visually appealing
2. Do images contribute to SEO?
Yes, certainly. By properly optimizing your images for SEO, you will not only attract more visitors through Google image searches, but you will delight your website visitors by using engaging images.
Overall, images improve the results of your website. Just make sure they're relevant and engaging.
3. Should we consider lazy loading when using images?
Lazy loading is a great way to speed up the loading time of your pages, especially when you use too many images in an article or page. With lazy loading, images are only loaded when they enter the viewport, reducing the number of HTTP requests.
We use the WP Rocket plugin because it helps you with the lazy loading function, but if you are looking for a free plugin just for the lazy loading function, you can try the A3 Lazy Load plugin.
4. Where can I find free, royalty-free images?
There are a few websites where you can download free images without giving any attribution or credit to the photographers or the website, including;
- Unsplash
- Pexels
- Stocksnap
- Reshot
- Pixabay
- Skitterphoto
5. Are image ALT tags important for SEO?
Alt tags on images are extremely important.
An alt tag, also known as an “alt attribute,” provides a textual alternative to search engines like Google.
Whether you know it or not, search robots read alt tags. By using relevant alt tags in your images, you can dramatically improve your organic ranking in the Google image search.
Summary
Image SEO is a great source of traffic, but the majority of bloggers and photographers often overlook the importance of optimizing their images for SEO.
If you are also one of them, stop doing it and start improve the quality of your images and optimize them for better search results.
To get the best possible results with SEO, you need to do everything in your power to help your website rank higher in Google search results and image SEO is one of the best practices for increasing your organic rankings.