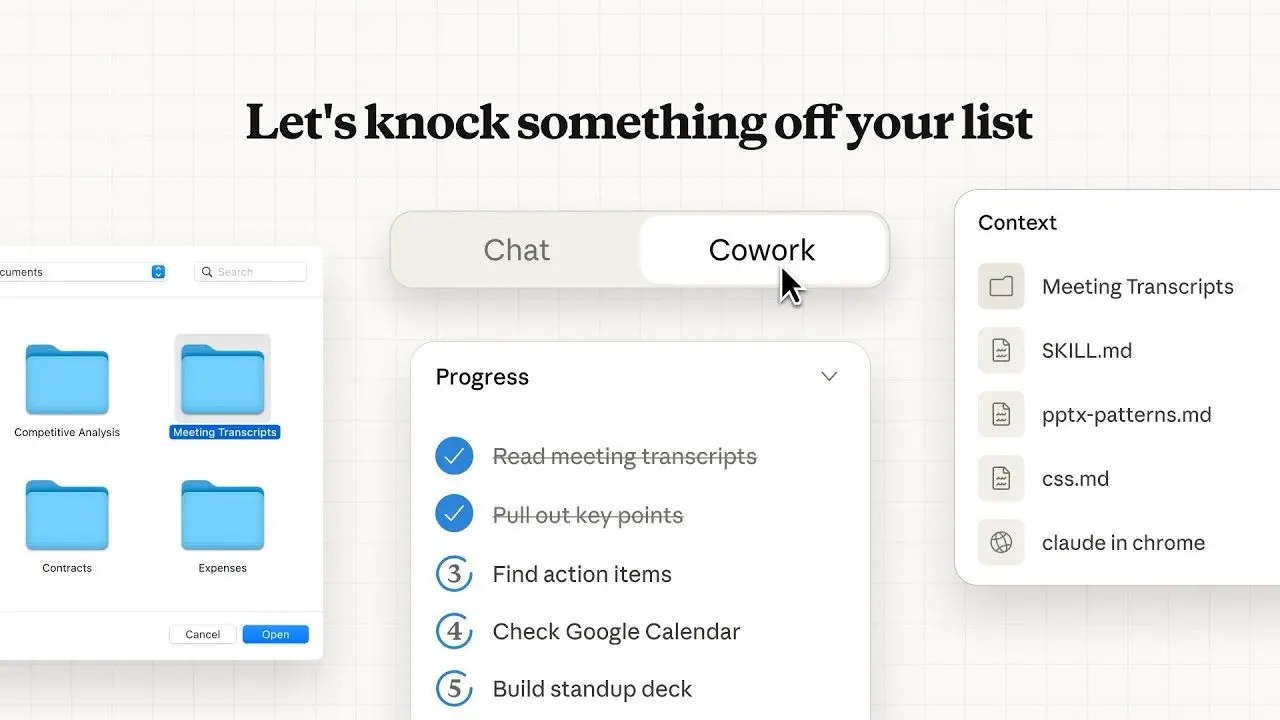
.svg)
To create an e-commerce business, you first need to have a platform on which to sell your products. Learn about the 10 steps for creating a Shopify store.

When you sign up for the first time to your free trial, Shopify asks you to name your store. Your store name will become your default URL (for example, site name). Myshopify.com).
The only way to personalize your URL is tobuy a unique domain name (for example, maboutique.com).
After answering a few questions during the initial registration phase, you will be directed to the main page for administering your Shopify account.

Before we move on, here are a few prerequisites for creating a Shopify store.
If you need help setting up your Shopify store, use the search bar at the top of the page to be directed to useful resources.
Before continuing, be sure to sign up for thefree 14-day trial. Feel free to open a new tab on your computer to follow the step-by-step instructions on creating a Shopify store.
To add products to your e-commerce store Shopify, go in”Products” (Products) and click on”Add a product”(Add product).

Now add information about your products as well as visuals.

This is the easiest part, but you'll need to take other actions to define the details of the products you're adding to your store.
Try using shorter page titles. Visitors who browse product category pages scroll quickly.
When visitors browse product pages in your category,The objective is to quickly highlight a product that arouses the interest of the visitor among all product titles.
When writing a product title, refer to a proven formula used by one of the biggest online retailers: Amazon.
Look at Amazon product titles: they almost systematically use 4 elements:
%25252525252520(1).jpeg)
For example, let's see the title of the above product for sale on Amazon:”Amazon Basics 3.6kg Neoprene Dumbbells, Set of 2, Yellow“.
If Amazon — the world's largest e-commerce marketplace — follows this formula for naming product titles, you should do the same for your own.
PDPs (product description pages) are critical to successful store creation Shopify.
Product pages help visitors decide if they are going to buy your items. When it comes to writing content for product description pages Shopify, you should include specific details.
You'll also need to consider your communication style.
Here's an example of a great product description:
%25252525252520(1)%25252525252520(1).jpeg)


As you can see, the needs of the potential customer and his animal are addressed several times.
Tip 1: Look up the descriptions of the main e-commerce sites to find out how to write your descriptions. The main e-commerce stores make TheA/B Testing to test their conversions and increase their sales.
A/B Testing consists of testing 2 slightly different versions of the same page. The aim is to see which variation generates the most sales.
If you don't have a budget, I recommend using the free application, Google Optimize:

Here is a complete article to explain its implementation:
READ MORE: How to use: How to use Google Optimize for A/B testing.
If you are on a bit of a budget, I suggest using one of the many applications Shopify tools offered in the app store, called Zipify, for A/B testing.
Its implementation does not require computer knowledge. This application also offers a suite of equally useful tools such as creating landing pages.
Zipify is known for developing one of the best drag-and-drop Shopify web page builders, which is very useful for creating Landing pages for sales promotions.
Keep in mind that product descriptions act like salespeople to make it easier to sell your product.
It would be a good idea to test your product titles and descriptions.
Follow these steps to write an effective product description that will increase sales:
Check off the parameters you want to improve by writing great product lists.
Gather the following information about your ideal customer. You can refer to sales data, online communities, survey responses, and reviews — or make assumptions. Note that some of the details listed may not be relevant to your specific product and audience.
DEMOGRAPHICS
INTERESTS/PRIORITIES
BEHAVIORS
The tone is the “personality” of your store or brand as conveyed by your writings (and how it is perceived by your target audience).
Fill in the following information about your product, keeping in mind the profile of your target customer.
PRODUCT
Example: Ergonomic mouse
REPRESENTATION
Describe in detail the appearance, feel, smell, taste, and/or sound of your product. Include details about how it's used and how it makes the user feel.
FEATURES/ADVANTAGES/BENEFITS
Example:
Ergonomic design
12400 DPI optical laser sensor
SEO KEYWORDS
List of keywords that your target customer can use when looking for your product.
Example: Ergonomic mouse; Wireless ergonomic mouse; Best ergonomic mouse for gaming
SPECIFICATIONS
Using your product attributes and customer profile information, write a product description in the format below. As you write, use the tone or personality that you identified in step 2.
PRODUCT TITLE
A clear and descriptive product name that incorporates your main SEO keyword Example: Rose Glow Face Gloss
INTRO/HEADLINE
A short introduction of one or two sentences including SEO keywords. How would you summarize your product in a way that encourages buyers to buy it?
Example: A versatile face gloss that prims and moisturizes all day long. This rosé gloss brightens skin to give it an ethereal glow, leaving it looking healthy, radiant, and refreshed.
ADVANTAGES
A bullet list or collection of headers with short explanations. Highlight the benefits of your product at a glance.
Example:
CORPS
A complete description in 1 to 3 paragraphs. Describe the use of the product and provide relevant details to inform, persuade, and qualify the reader by showing how they will improve their lives. You can tell a story about the origins of the product, solve customer problems, provide use cases, or all of these at once.
Example: This shimmery lip gloss in four shades is sprinkled with pink and gold pigments to give eyelids, cheeks, and lips a shimmering shine when worn alone or with makeup.
For years, we've been watching makeup artists behind the scenes at major fashion shows, using lip gloss to give them a seductive shine. But the lip gloss was still melting and leaving shortly after the models left the runway. This lip gloss is made for real life: it stays in place and adds sensual shine to the face.
Apply this face gloss to your eyelids, cheeks, and lips. It works on clean skin or over makeup. Our exclusive vitamin complex and skin-loving ingredients provide radiant hydration for 24 hours to leave you ready to hit the track all day long.
These additions can appeal to buyers and boost sales. Complete all of the following fields that apply to your product and add them to your written description.
Once you've written your product description, review your work and verify the following qualities:
Are you lacking inspiration?
Tools like Jasper AI allow you to write your products and descriptions using artificial intelligence.
RECOMMENDED READING: The best AI-assisted writing tools
Communicate about needs rather than wants.
Visitors who come to your Shopify store want to buy, but they need to feel confident to buy your product.
Watch how the description inspired user confidence. This is a great example of communicating with your audience.
Descriptions should be easy to read, with subtitles, short paragraphs, and bullet points.
Identify bottlenecks in the buying cycle.
Are your visitors afraid of buying the wrong size? If so, include a size chart.
Eliminate any reason not to buy a product on your store Shopify.
A good practice is to keep all your users' questions in a file and include them in the FAQ.
Marketing has a name for product differentiation called USP. It is an abbreviation for (Unique Selling Point).
Ask yourself what you can include to make your product stand out from the competition.
What is your USP? Highlight it every time.
You'll need images to add to your store.
To add images, select”Add file” (Add File) in the media section of the product page. You can download the following media formats.

RECOMMENDED READING: Best YouTube Playlist Downloader Tools
Tip 2: Optimize your images for Google Discover. Google Discover is a feed that appears on the home page of Google's mobile search applications.
Google Discover shows big images that will encourage more people to click on your site.

If you want to learn how to appear in Google Discover, you can read my article entitled”What is SEO and how does it work?
I'm breaking down all of Google's search features and showing you exactly how to appear in the various Google search results. Today, there are a large number of non-standardized Google search results.
I highly recommend that you read my article on the SEO on Shopify to understand each search function and how to appear in each of them.
A price list that is too high or too low can make or break an online store.
I recommend that you use the price comparison parameter to indicate the usual cost of your products.

I especially recommend this tactic during the holiday season, when special sales need to be put in place to compete with other e-commerce stores.
If you intend to sell luxury items, this option should be used sparingly, as it can reduce the impression of exclusivity of the most expensive items.
Tip #3: Use the cost per item function. You will be able to track your profit margin per item sold.
Keep in mind that lower prices don't always generate more sales. In many cases, visitors to your online store will rate the quality of the product based on the price you set.
Price tests are essential to the success of e-commerce sites.
ATTENTION : Do not perform A/B price tests of the same product. It's illegal.
The key word here is same product. Let's get into the details so you can test your prices once your Shopify site is live.
Here's an example of how you can legally test prices.
Take a close look at the example below.


The only difference above is the amount of storage offered in this example, which creates a unique product offering. For e-commerce, this can take the form of an accessory or a feature added to a product to differentiate its price.
To test the example I mentioned above for your specific products, you can use Zipify, the Shopify app I mentioned earlier.
This part will vary for those who choose to use the Shopify dropshipping or to use the Print-on-Demand from Shopify.
These 2 options do not necessarily require you to keep an inventory.
If you need to track physical products, you'll need to be familiar with SKU numbers, bar codes, and quantities.

The SKU (Stock Keeping Unit) is used to track retail product inventory.
A SKU number requires consistent tracking by numbers or letters that allows you to identify specific products. For example, a blue bottle of water. (Blu-WB) BLU=blue WB= water bottle
Barcodes (ISBN, UPC, GTIN, etc.) are mainly used for reselling products.
The quantity is the number of items you have in stock. Shopify gives you the option to continue selling when inventory is sold out. In addition, you have the option of choosing “sold out”.
Navigate to “Product” and click on”Collections” Shopify will give you the option to add products to collections or automate what's included manually.
Shopify offers you the possibility to:
I recommend that you implement all three of the above. If you have variant options for the same product, like different sizes and colors, Shopify can add the product variants to your page.
To set up product variants for your pages, click”This product has several options“. While Shopify product variants offer some flexibility, Shopify doesn't eliminate the need to manually update the specifics of your product variants.

You will need to update the following items for each product variant.
Managing your product catalog can be a difficult task when you have multiple products. This is not the case when creating a Shopify store.
The organization section makes it easy to manage multiple products.
Apply tags to your products so Shopify can group them together to better manage your catalog.

Here is the breakdown of tags:
I've mostly talked about products at this point, but your e-commerce site will need pages other than product pages to be successful.
You will need to explain to your visitors what differentiates you from the rest of the e-commerce stores. Go in”Online store“, click on”Pages”. I recommend creating the following pages.
Give visitors a way to contact you if they have questions.
The home page has the power to encourage visitors to buy if you give them a compelling reason to buy from you.
Here is a great example of a home page:


Telling a strong story is a great way to persuade potential customers to become buying customers.
Notice how Converkit presents its mission using storytelling and well-known influencers.
By the way, Convertkit is a provider of automated emails to drive sales. I recommend using this software once you are up and running.
An FAQ page is pure gold for e-commerce sites. The FAQ pages will help you answer any questions that visitors or existing customers may have in order to reduce the volume of calls and emails sent to your customer support team.
Here's a great example of an FAQ page from Lightspeed:

If the number of questions is large, you can add a search bar so that visitors can type in the specific questions that concern them the most.
Also, add a “submit a request” function for any topic that is not covered.
From a legal perspective, any lawyer would suggest that you put this in place.
I also recommend it, even if I am not a lawyer 🙂
Luckily, Shopify produces templates that you can use. Navigate to”Parameters“(Settings) , click on” Policies”. “

Shopify will calculate the shipping costs for you.
To set up shipping details, navigate to” Parameters “, click on” Shipping and Delivery”. “

It's up to you to decide on all shipping options based on the products you sell, but I recommend that you pay close attention to three key factors.

You will receive printable shipping labels for all physical products.

Be sure to click on”This is a physical product“, then enter more details about your product.
I strongly advise you to keep your products light to avoid high shipping costs that can eat into your margin.
For customs, you will need to enter your country of origin. Use the search bar in Shopify to find the Harmonized System code for your specific products.
Les United Nations trade statistics define the harmonized system as an international nomenclature for classifying products. Participating countries classify traded goods using a six-digit code.
SEO (search engine optimization) is the process of optimizing web pages to increase the visibility of your site in SERPs (search engine results pages).
Shopify provides an overview of the search engine list so you can see how your pages will appear in search results.
You can customize the look and feel of any page.

I've written a detailed guide explaining What is SEO and how does it work, which explains how Google selects and indexes web pages.
Once your e-commerce site is up and running, be sure to read it for very useful tips.
READ MORE: SEO Shopify, How to optimize your e-commerce site for search engines
I recommend that you use SEMrush to find out the estimated monthly search volume for specific keywords.
Once you've found your set of keywords, place them strategically in your titles, descriptions, URLs, and alt text to get more search traffic.
Don't aim for the highest search volume as it will be too competitive to be competitive. Target keywords that have fewer than 1,000 monthly searches.
How you choose to personalize your e-commerce store is entirely up to you.
I recommend that you take inspiration from the design of the main e-commerce platforms.
As I mentioned earlier in this guide, large e-commerce sites spend a lot of time optimizing pages to optimize their conversion.
Simply search for the main e-commerce sites that sell products similar to the ones you plan to sell and imitate their presentation. Let your competitors do the heavy lifting for you.
Navigate to”online store”, click on”themes”, you will be presented with a large number of Shopify themes from the Shopify Theme store.
I recommend that you not spending a lot of time looking at models, because you can always switch to other Shopify themes.


Remember, you should focus on launching your site to generate sales rather than on the beauty of the site. Design is essential, but function is more important than the design element to create sales.
Shopify charges additional fees for specific themes. But Shopify allows you to test a theme before you buy it.
If you find that Shopify theme designs are not to your liking, you can find some of the best Shopify themes at ThemeForest.
In general, ThemeForest themes are cheaper than those in the Shopify theme store.
Include the following navigation elements in your Shopify e-commerce store.
In the section”Theme settings“, Shopify offers you the option to personalize your payment page.
Here are some recommended things to add to your checkout page:
After adding a theme, key pages, and customizing your checkout page, ask for feedback.
You can start by asking your peers.
Here are a few other places where you can consider getting design feedback:
Taxes are unfortunately a reality, but thankfully, Shopify automatically takes care of most of your tax calculations.
By default, Shopify uses the sales tax rates that are already in place internationally.
I recommend that you check your default tax rate against the tax requirements specific to your region.

To adjust your default tax rates, go to”Settings” and click on”Taxes“.
I recommend that you create a custom report using a default template called”Overtime taxes“to track the amount of taxes collected. To set up a custom dashboard, go to”Analytics”, click on”Reports”. “

I recommend that you consult a tax professional if you are unsure about your tax concerns.
To set up payment processing in Shopify, go to”Settings” and click on”payments“.
You have the option to select “Shopify Payments,” where the transaction fee will be 0%. You also have the option of choosing over 100 third-party payment providers.

Verify that your country is on the list of supported countries for payment processing.
Recommended settings to configure for payment processing
To launch your Shopify website, you'll need to turn off password protection since your site isn't live yet. To turn off the password protection screen, go to” Online store “, click on” Themes. “

Here are the last things you'll need to set up before putting your site online.
If you haven't registered a domain name yet, go to”webshop“and click on”domains”. Shopify allows you to buy a domain name directly on the platform.
You can also transfer domain names or a web hosting if you have one.

Setting up automated emails and SMS push notifications is useful for informing your customers about order confirmations, new inventory, out-of-stock, and more.
To set up both automated emails and SMS or push notifications, go to”Settings”, click on”Notifications“.

Shopify gives you the ability to add multiple sales channels to your store.
To implement multiple sales channels, go to”Sales channels“, click on the plus symbol next to”Online store“.
Here are a few channels you can consider setting up if this applies to your business model.

You have a ton of options.
Choose the ones that best suit your business model and channels.
By default, Shopify provides sales analytics, which will allow you to track sales.
To view your analytics data, go to”Analytics”, click on”Reports”, “Reports“and “Reports.”
I also recommend setting up Google Analytics for greater granularity.
I recommend that you implement the Facebook pixel to be able to accelerate your sales.
Have you ever seen an advertisement pop up that seems to be reading your mind?
This is due to third party software that uses cookies. There are several third-party software programs that perform retargeting similar to the Facebook pixel, but the Facebook pixel is considered to be one of the best.
The Facebook pixel tracks visitors who have made purchases and those who have added products to the shopping cart.
The pixel is useful for retargeting your visitors because it collects detailed information about your visitors using proprietary software.
Here's a list of events that Facebook can track to help you retarget customers.

You're not just limited to the interactions listed above. The Facebook pixel allows for much greater personalization to support your marketing efforts.
The time has come to launch your e-commerce store.
I went through a lot of the details about how to set up your installation in Shopify, but the journey is not over.
To attract traffic to your e-commerce store, you need to be proactive in your marketing to boost sales.
Below, I've included some frequently asked questions when you start an e-commerce site.
Shopify offers a free 14-day trial. Once the trial is complete, you have three pricing options.

The basic option is recommended for creating a new e-commerce store.
After creating a Shopify store, I recommend that you create a blog to create content that will allow you to rank more easily in search engines.
Also take the time tooptimize the content of your e-commerce store to reach more visitors.
A blog will help you convert visitors into customers that land on your blog posts. So without further ado, let's get started.
Average order value is a measure used to determine the average order value generated by an e-commerce store.
The AOV is calculated by dividing revenue by the number of orders received during a given period of time.
COGS (Cost Of Goods Sold) is the cost of producing the products you sell. COGS includes the cost of materials and labor expenses to produce the product. It excludes logistics costs and marketing expenses.
The COGS formula is as follows: (initial stock+purchases - final inventory).