.svg)
Learn how to build a Squarespace website. Follow this beginner-friendly guide to successfully create and customize your Squarespace site.

It's gone! Go on Squarespace.com. This will be your launch pad, so feel free to bookmark the URL.

In this next step, the platform will ask you a few questions. Don't worry, no one will judge you and there are no wrong answers. Simply choose a tag that describes what you are about to create, or describe your website by writing a short description.

This information will help Squarespace to find starting ideas and examples so that your website creation journey starts off on the right foot.
If you still don't know what your site is going to be about, you can always skip the questions by clicking on the “SKIP” button at the bottom of the page.
As with the last step, select one or more options. Do you want to write a blog, promote a business, or maybe sell products?

Check the boxes that match your aspirations. Although these answers are taken into consideration when creating a demo page for you, you can always add or remove elements and features from your site later (more on this later in the “Using a site builder” section). Squarespace“).
Where are you in your process? Are you still working on the idea of the website itself, or do you already know most of the features you want to add to your site? Maybe you already have a website on another platform and want to move it to Squarespace?

Pick your answer, and you're done with the onboarding process.
This is where the fun part starts. You've completed the Squarespace quiz and can now choose a template. This is what your site will look like, so take your time and go through them all until you find a template that you really like.

When you're happy with a template, hover over it and click the preview button to see it in action. If you want, you can repeat the process, but this time choose the “Start with” button to select a template.
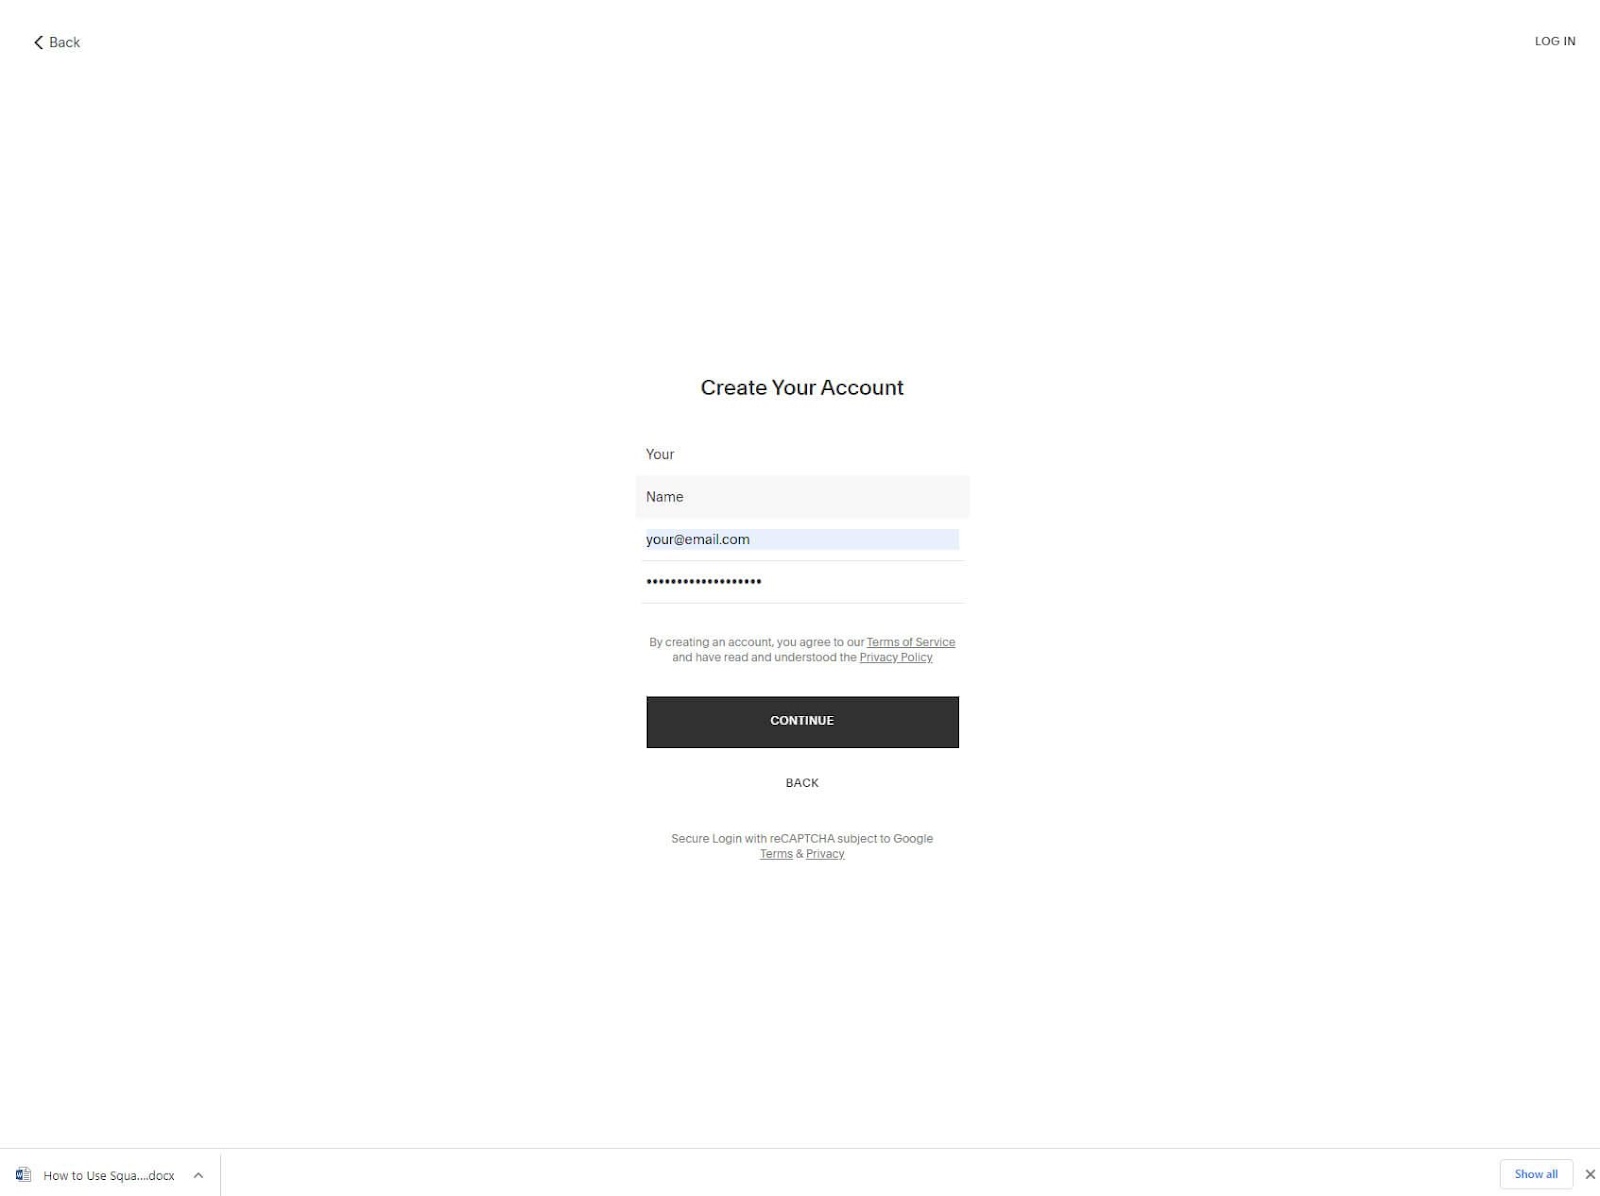
You can create your account by entering your email address. But for everything to be faster, Squarespace offers the possibility of creating new accounts by connecting existing Google, Apple or Facebook accounts.

Choose the method you prefer, as it makes no difference later on.
Fill in information such as your name, email, and password, then click the “Continue” button. If you choose to sign in with Google, Apple, or Facebook, a pop-up window will appear asking you to sign in to your account to continue.
Wait for Squarespace to gather all of the required data, and you'll be automatically signed in to your new account. Start your engines!
Squarespace has a very pleasant interface. You'll notice it the first time you log in, when the platform guides you through a few additional steps where you can name your site and learn some of the most important functions like adding pages. Feel free to explore and learn from the start.

When you start working with Squarespace, the most important settings are in the left sidebar menu. There you will find:
When you're ready to start working on your site design, simply click on the “Edit” button at the top. This will open the Squarespace editor where you can start customizing pages.
Squarespace is a visual editor. This means that everything you do is done directly on the website by choosing the elements one by one.
Let's start at the top and move to the bottom.
Move your cursor to the top bar, called the header. A small button is displayed, allowing you to change the header. This is where you can upload your logo, add a title to the site, choose what to display (like social buttons and icons), work with different colors, or even make the header fixed (which means it will always stay at the top of the page while your visitors scroll).

The sections are as follows to be edited. The first section, under the header, is usually the largest and contains huge, so-called “heroic” images and text that should catch your visitor's attention. Hover over the section and choose the small edit button (pencil) on the right side of the screen. You can then select the height, width, content alignment, background, colors, etc. of the section.
Feel free to explore and move at your own pace. When you decide to change text, buttons, or anything else, hover over them to reveal their settings. Depending on the model you select, the items will be different. So you can expect text, images, buttons, forms, videos, and more.

To continue editing the template, keep moving to the bottom of the page and repeat the process - hover over an element you want to redraw and start playing with the options.

You can easily delete sections or move them up or down by clicking on the right side menu button that appears when you hover over a specific item.
If it gives you control over existing items, you're probably wondering how to add new ones. Did you see a small, bluer icon when you hover over the items? It's the secret! It appears at the top and bottom of each segment, representing a location where you can add a new section. Go on, click on it. A new pop-up window opens, revealing all the sections you can add to your Squarespace page.
There are dozens of sections, each with their own variations. Take your time and go through them all. You can add lists, galleries, images, forms, charts, and more.
As soon as you click on an item, a new section appears on your site. To further customize it, hover over the blocks and continue to explore the options.
Adding stuff is fun. But two of the features that are most requested by users are the Blogging And the e-commerce. They are not in the list of items that I showed you earlier. So let's see how to quickly add them to your site.
Although adding a blog may seem complicated, the truth is that a blog is nothing more than another page. To add one, you need to exit the design editor by clicking on the “Done” button in the upper left corner.
From there, select the first “Pages” option.
Chances are your blog is already on the list. It depends on the answers to the questionnaire and the model you selected. If a blog is on the list, you can simply select it.

Alternatively, you can quickly add a blog by clicking on the “+” icon and choosing a blog from the list.
Once you have a blog on the list, you can open the page. Since you've already started with a model, that means you'll have already prepared some demo content. On the left side of the screen, you'll find your existing blog posts. On the right, you'll see your current blog or a specific blog post when selected.
To add a new message, find the “+” icon in the menu. Clicking on this icon takes you to an editor where you can write a title and the main content. Great, isn't it?
Like a blog, your model may already have a store. If this is not the case, you can add one by selecting the “+” icon and then the “Store” option.

A new popup window will show you two versions of a store that you can have. Select the one you prefer to continue with the editing process.
On the left hand side, you will find all of your demo products with their prices. Click on one of them to see what it looks like on the right side. It's just the preview (what your visitors will be able to see).
When you decide to start editing products and adding your own, you should click on the suspension point and choose the edit options. This will bring up a completely new screen, allowing you to get into the details.

Edit images, add prices, monitor inventory, variations, and more.
Even though you've finished designing your site, you're not quite ready to publish it yet. There are more important things to deal with, so bear with me.
If you want others to find your site more easily via Google, Bing, Yandex, and other search engines, you need to take care of a few options of SEO (search engine optimization).
When editing your site, look for the small gear icon in the top right corner of your browser (I know it should have been more visible). In the settings window that appears, choose “SEO.”
That's it, the most important SEO options for your site are in front of you, namely the title and description of the page you are editing. This is the information that will be visible on search engines when users find your site by asking Google a question. You'll recognize them when you look at the preview.
You need to repeat this process for each page on your site. Once you've published the site, be patient. It may take a few hours, days, or even weeks for search engines to crawl and index your site with the changes you selected.
In the modern world, optimizing your site for mobile is as important as optimizing it for Google (these two elements actually go hand in hand). Luckily, Squarespace makes it easy for you.

When editing a page, you can find a small mobile icon on the top bar. This will allow you to preview your site on a mobile phone. That's all, there are no changes to be made here because all the Squarespace templates are automatically responsive (that is, they modify the elements so that they are displayed nicely on all screen sizes).
It would be great to be able to edit the mobile site and add/remove specific items for mobile users only, but unfortunately, all site changes with Squarespace are global (affecting all versions of the site).
The dashboard is always accessible by going to account.squarespare.com. If you are logged in, this is where you can start working with your site (s). The dashboard shows all the sites you've created and allows you to create a new one.

By choosing the website or business option, you access the settings area, while clicking on the ellipse, you can manage permissions, billing, other settings, and even duplicate the entire site or delete it.
On the top bar of the page, you'll also find a domain tab where you can connect existing domains or buy a new one. Until you choose one of these options and upgrade your plan, your site will be under the Squarespace subdomain.
On the right-hand side, you'll find links that take you to documentation and account settings.
While you can test Squarespace for 14 days, unfortunately you're not allowed to publish your site during that time.
To be able to publish a site, you need to have purchased a paid subscription. Then, you can publish your site by going to Site Availability in the Settings menu. You will then be able to make your site public, private or protected by a password.
In addition to a 14-day free trial, Squarespace offers a variety of paid plans that you can pay for monthly or annually. If you decide to pay annually, you'll save up to 30% and get a free custom domain all year long.
$12.00 per month (1-year plan billed in a single payment of $144.00).
$18.00 per month (1-year plan billed in a single payment of $216.00)
$26.00 per month (1-year plan billed in a single payment of $312.00).
$40.00 per month (1-year plan billed in a single payment of $480.00)
Squarespace comes with a Free 14-day trial During which you can test the service and design your website. But Squarespace is not free. If you decide to publish your site or continue working on it after the trial period, you will have to select one of their subscription plans.
Yes, you can make money with a Squarespace website.
If you have a product or service to sell, you can take advantage of Squarespace's e-commerce features that allow you to create a complete online store. On the other hand, even if you don't enter the e-commerce world, you can earn money by selling sponsored content, displaying banners, or a variety of other ads.
Earn money through affiliate programs is also very easy on a Wix site.
Wix and Squarespace are both good website builders. It's hard to choose one because they both have their pros and cons.
With that in mind, you should also be aware that Wix can be used completely free of charge, without ever paying a cent, while Squarespace only comes with a two-week free trial.
In addition, Wix has a more powerful editor and numerous features that allow you to have better control over your site.
Building a Squarespace site isn't complicated. So even though this was your first encounter with a website builder, I'm sure you enjoyed creating a website and learned something.
But don't stop there. Now that you have a site up and running and you know how to get around Squarespace, take more time to explore all of the options available. There's even more information and possibilities that I didn't cover in this guide. So take your time, create another test site, and play until you are able to create what you originally had in mind - a beautiful personal or professional site from your own site!