Mastering LinkedIn Sales Navigator for B2B Prospecting: Comprehensive Guide 2026
Discover how to optimize your B2B prospecting on the professional network LinkedIn Sales Navigator: Expert Guide. Best practices for identifying prospects.
LinkedIn Sales Navigator is the essential tool for professionals aiming to excel in B2B prospecting and lead generation.
In 2026, with over 850 million professional profiles on LinkedIn (according to the latest estimates), this platform remains the leader in professional networking. Sales Navigator, its premium version, offers advanced features to precisely target your prospects, organize your prospecting efforts, and maximize your results.
What is LinkedIn Sales Navigator and what is it used for?
LinkedIn Sales Navigator is a premium solution designed for B2B sales prospecting and qualified lead generation.
Unlike the free version of LinkedIn, which is limited to basic networking, Sales Navigator offers powerful tools to:
Identify decision-makers and influencers in your industry.
Segment your prospects for targeted approaches.
Directly contact your targets through personalized messages (InMails).
Track opportunities with real-time alerts.
In 2026, Sales Navigator is essential for companies seeking to optimize their social selling in a world where competition for capturing prospects' attention is fierce.
For example, a salesperson can use it to identify sales directors in tech companies that have recently raised funds, then approach them with a relevant message.
How to get started with LinkedIn Sales Navigator?
Step 1: Subscribe and set up your account
To begin, access LinkedIn Sales Navigator and choose a plan that suits your needs. In 2026, the options include:
Core: €99/month for individual users.
Advanced: €162/month for teams, with collaborative features.
Advanced Plus: Price on request, for large enterprises with CRM integration.
After registration:
Optimize your LinkedIn profile: Add a professional photo, a compelling headline, and a client-oriented summary (e.g., "I help SMEs boost their sales with innovative B2B strategies").
Set your preferences: Indicate your target sectors, personas (e.g., startup CEOs), and objectives to personalize recommendations.
Step 2: Get familiar with the interface
The Sales Navigator interface is clear and intuitive:
Dashboard: Suggestions for prospects and personalized alerts.
Advanced search: Filters to find your targets.
Lead lists: Organization of your leads.
InMails: Direct messaging for out-of-network contacts.
Take 10 to 15 minutes to explore these sections before launching your first searches.
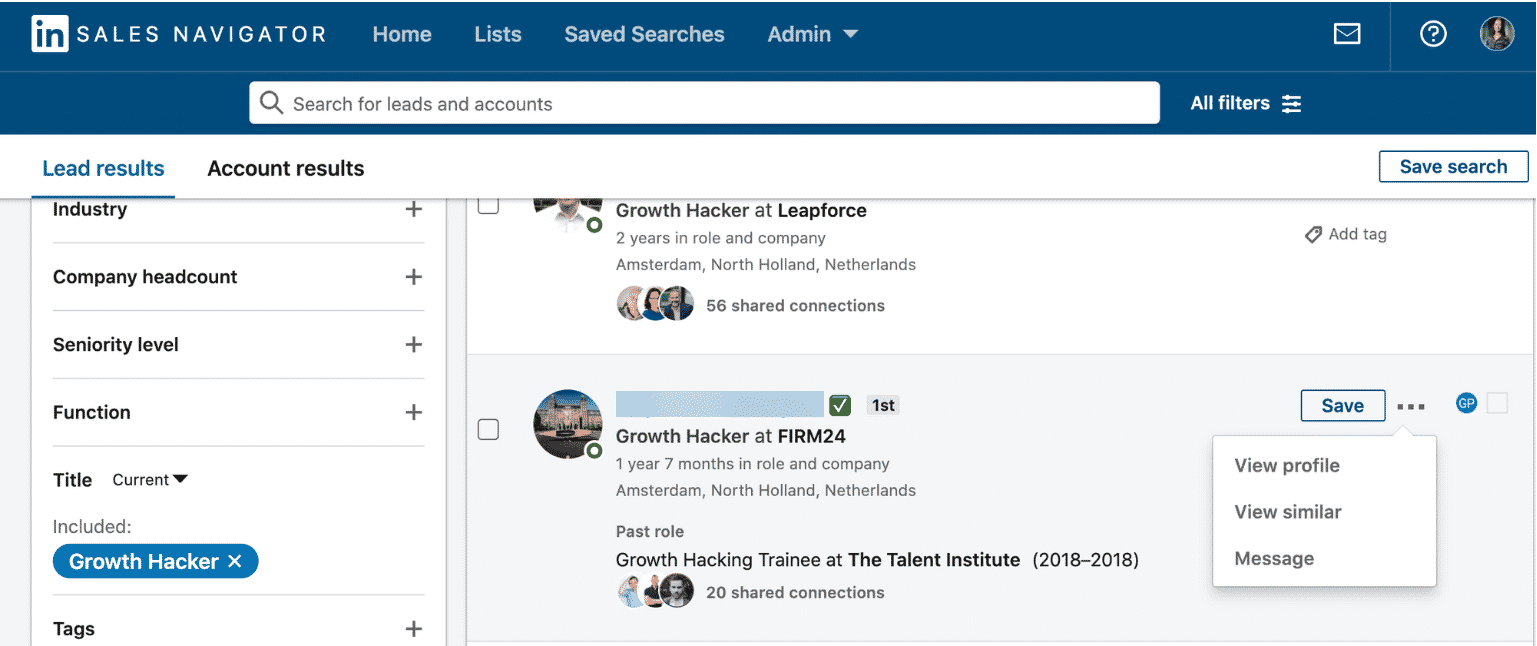
What filters and search types are available?
The advanced search is at the heart of Sales Navigator, with over 30 filters to refine your results. Here are the main ones to master:
Different filters
🗂️ Category
🔑 Filter
📋 Description
💡 Example
🤝 Prospects
🏷️ Job Title
Filter by function or current role in the company, with AI suggestions
"Chief Marketing Officer", "Data Scientist"
🤝 Prospects
📍 Location
Geographic targeting by country, region, city, or postal code
"Paris, France", "San Francisco Bay Area"
🤝 Prospects
🏢 Current Company
Specific company name or size (employees or revenue)
"Google", "Companies with 100–500 employees"
🤝 Prospects
🔄 Job Change
Prospects who have recently changed positions (30, 90, 180 days)
"Job change within 90 days"
🤝 Prospects
🔗 Shared Connections
Common connections (1st or 2nd degree) for warm approaches
"Prospects with ≥2 shared connections"
🤝 Prospects
📢 Recent Activity
Prospects active on LinkedIn (posts, comments, shares)
"Posted within the last 30 days"
🏢 Companies
👥 Company Size
Segmentation by number of employees or annual revenue
How to integrate Sales Navigator into your sales or marketing workflow?
Saving search settings in LinkedIn Sales Navigator
Target your personas: Use filters to define your ideal clients.
Automate with tools: Integrate Sales Navigator with a CRM (HubSpot, Salesforce) or use solutions like Emelia.io for multichannel campaigns (LinkedIn + email).
Track your KPIs:
InMail response rate.
Connection request acceptance rate.
Number of converted leads.
Collaborate: With the Advanced plan, share lists and notes as a team.
Conclusion
In 2026, LinkedIn Sales Navigator remains a powerful lever for B2B prospecting. This guide has shown you how to:
Get started and set up the tool.
Target your prospects with precision.
Effectively contact your leads.
Integrate Sales Navigator into your strategy.
With LinkedIn Sales Navigator, you can turn your B2B prospecting into tangible results. Take the time to explore its features, personalize your approaches, and test the tool with the 30-day free trial to boost your sales performance.
Proven Methods and Growth Tips for LinkedIn Sales Navigator
Transform your Sales Navigator searches into an automated lead generation machine. Here are the tested strategies that truly work in 2026.
Intelligently Automate Your Prospecting Campaigns
Once your prospect list is created in Sales Navigator, automation becomes your best ally.
Set up multi-step outreach campaigns with personalized messages and automatic follow-ups after 2, 3, or 5 days. Dynamic variables automatically pull information from profiles to personalize each approach.
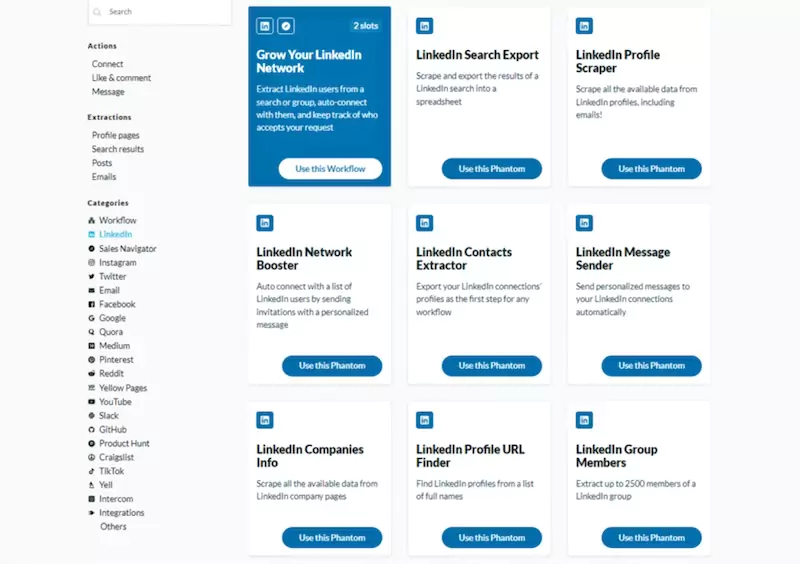
Leverage the Power of LinkedIn Groups
Phantombuster Strategy: Identify groups where your target audience is concentrated (e.g., "Growth Hacking France" for tech marketers). Use Phantombuster to extract the complete list of members, then import it into your preferred LinkedIn automation tool. This approach gives you access to thousands of qualified prospects in just a few clicks.
Engage Through Post Keywords
Sales Navigator allows you to filter by keywords in published content. It's a goldmine for identifying prospects active in your topics.
Effective Template:
"Hello {first name}, Your recent post on {keyword} caught my attention. I've developed a method for {keyword-related benefit} that might interest you. Would you like to discuss it?"
The Lead Magnet Strategy
Offer valuable free content right from the first contact. Prospects are 3 times more likely to accept a connection when you offer something useful.
Tested Example:
"Hi {first name}, I noticed you work in {industry}. I've created a guide on how we generated 250 B2B clients via LinkedIn in 4 months. Interested? I'll send it to you for free if you accept my connection 😊"
Connect with Local Decision-Makers
For local B2B networking, use geographic filters combined with company criteria:
Geographic Area: Your city/region
Company Size: 1-50 employees
Industry: Your target market
Best Practices to Maximize Your Results
Mandatory Warm-Up Phase: Start with 10 requests/day for 2 weeks, then gradually increase to 30-50/day. LinkedIn detects abnormal behaviors.
Optimized Profile = 40% Higher Acceptance Rate: Professional photo, benefit-oriented headline, summary that speaks to your target audience.
Post Regularly: Prospects who see your valuable content are twice as likely to accept your requests. Share insights, case studies, practical tips.
Optimal Timing: Tuesday-Thursday, 8-10 AM and 5-7 PM for connection requests. Avoid Monday morning and Friday afternoon.
Recommended Tools for Automation
Waalaxy: Most popular, simple interface, good value for money
Lemlist: Excellent for multichannel campaigns (LinkedIn + Email)
Phantombuster: Essential for data extraction
Dripify: Cloud-based, secure, perfect for teams
Note: Always respect LinkedIn limits to avoid restrictions. Quality over quantity in your approaches.
Conclusion: Take Action with LinkedIn Sales Navigator
LinkedIn Sales Navigator is no longer an option; it's a must for any serious B2B prospecting strategy. With its advanced filters, smart alerts, and automation capabilities, this tool transforms time-consuming prospecting into a scalable and predictable process.
The results speak for themselves: companies mastering Sales Navigator generate on average 45% more qualified leads, with conversion rates 3 times higher than traditional methods.
Your next steps:
1. Try it for free: Take advantage of the 30-day trial to explore the features without commitment.
2. Start small: Create your first list of 50 highly targeted prospects and test different approaches.
3. Measure and optimize: Track your response rates, refine your messages, iterate constantly.
4. Gradually automate: Once your templates are validated, scale up with automation tools.
The ROI of Sales Navigator is measured in weeks, not months. Each day without using it is lost business opportunities to competitors already equipped.
FAQ
How to Start Using Sales Navigator?
First, subscribe to a Core, Advanced, or Advanced Plus plan. Then, optimize your LinkedIn profile with a professional photo, a clear headline, and a client-focused summary. Finally, familiarize yourself with the dashboard, advanced search, and list management before you begin.
What Search Filters Can I Use?
Sales Navigator offers over 30 filters including current position, location, company, and recent changes. The Boolean search allows you to combine terms with AND, OR, and NOT. For example: "Director AND Marketing NOT Assistant" to precisely target your prospects.
How to Organize My Prospects into Lists?
Conduct a search and select relevant profiles. Click on "Save to list" and name it explicitly. Add custom notes and segment by priority. You will receive automatic alerts on their activities for optimal follow-up.
How to Approach My Prospects Effectively?
Personalize each InMail by mentioning a specific detail about the prospect. Always include a relevant note in your connection requests. Practice indirect engagement by interacting with their posts before contacting them directly.
Why is Sales Navigator Better Than Free LinkedIn?
Sales Navigator offers 30+ filters compared to 5 in the free version, unlimited searches, 50 InMails/month (Core), prospect alerts, and CRM integration (Advanced). These features make prospecting much more targeted and effective.
What Are the Best Practices for Sales Navigator?
Optimize your profile to inspire trust. Use alerts to react quickly to opportunities. Consistently personalize your approaches. Segment your lists by priority and reserve InMails for the most qualified prospects.
What Mistakes Should I Avoid?
Avoid generic messages that kill your response rates. Do not neglect activity alerts. Keep your lists organized and up-to-date. Ensure your profile is 100% complete before prospecting.
How to Integrate Sales Navigator into My Strategy?
Define your personas with filters. Sync with your CRM (Salesforce, HubSpot). Track your KPIs: response rate, conversion rate. Use the collaborative features of the Advanced subscription to align your team.
What Advanced Tips Can I Use?
Master Boolean search for precise targeting. Use Smart Links to track engagement. Leverage TeamLink for introductions via your colleagues. Export your lists for multichannel campaigns.

.svg)